
Set up one Oysterun Host on the computer that will run your work, open its dashboard, and then read each visible identity from the screen that owns it. A Host, Session, AgentFolder, Agent ID, and shared Website link can contain similar words without being interchangeable.
1. Prepare the computer and authority
Use a normal terminal as the same operating-system user who will run Oysterun. Before installing, prepare:
- a supported macOS or Linux computer that can remain on while you use the Host;
- The installer qualifies or repairs Node.js and npm to Node.js 22 for the target user. On macOS without Homebrew it stops before mutation and directs you to the official Node.js installer.
- Codex, Claude Code, or Grok installed and signed in for that same user if you want to start Sessions immediately;
- one existing folder to use as Default Browse Root;
- a new Host password that you can enter twice; and
- outbound HTTPS access for normal Managed connectivity.
2. Install Oysterun and enter setup
Prerequisites: Ubuntu 22.04+/Debian 12+ with Bash, or macOS with Bash or zsh. Download requires curl. On Ubuntu/Debian, direct root can run apt-get update && apt-get install -y curl; an ordinary administrator can run sudo apt-get update && sudo apt-get install -y curl. macOS normally includes /usr/bin/curl; if it is missing, stop and restore it through macOS Software Update or Apple Support. Use administrator access only for these bounded prerequisites or when the installer explicitly requests it.
Use the same one-command installer as Home and Getting Started: curl -fsSL https://oysterun.com/install.sh | bash. The installer then opens guided setup; do not replace this with a bare global npm install.
Open the complete review-and-confirm command.
When required Host settings are missing or incomplete, oysterun enters setup automatically. To reopen the setup questions later, use:
oysterun setupBefore step 1, Oysterun checks whether Codex, Claude Code, or Grok is available. If none is found, it shows Continue setup without an agent provider?
- Choose No, or press Enter for the default No, to stop safely. The terminal should end with Installation cancelled; no changes were made.
- Choose Yes only when you intentionally want to configure the Host before installing a provider. Host installation and setup do not require a provider; creating a provider Session later requires one supported provider installed and authenticated for the same operating-system user.
3. Complete the setup steps that appear
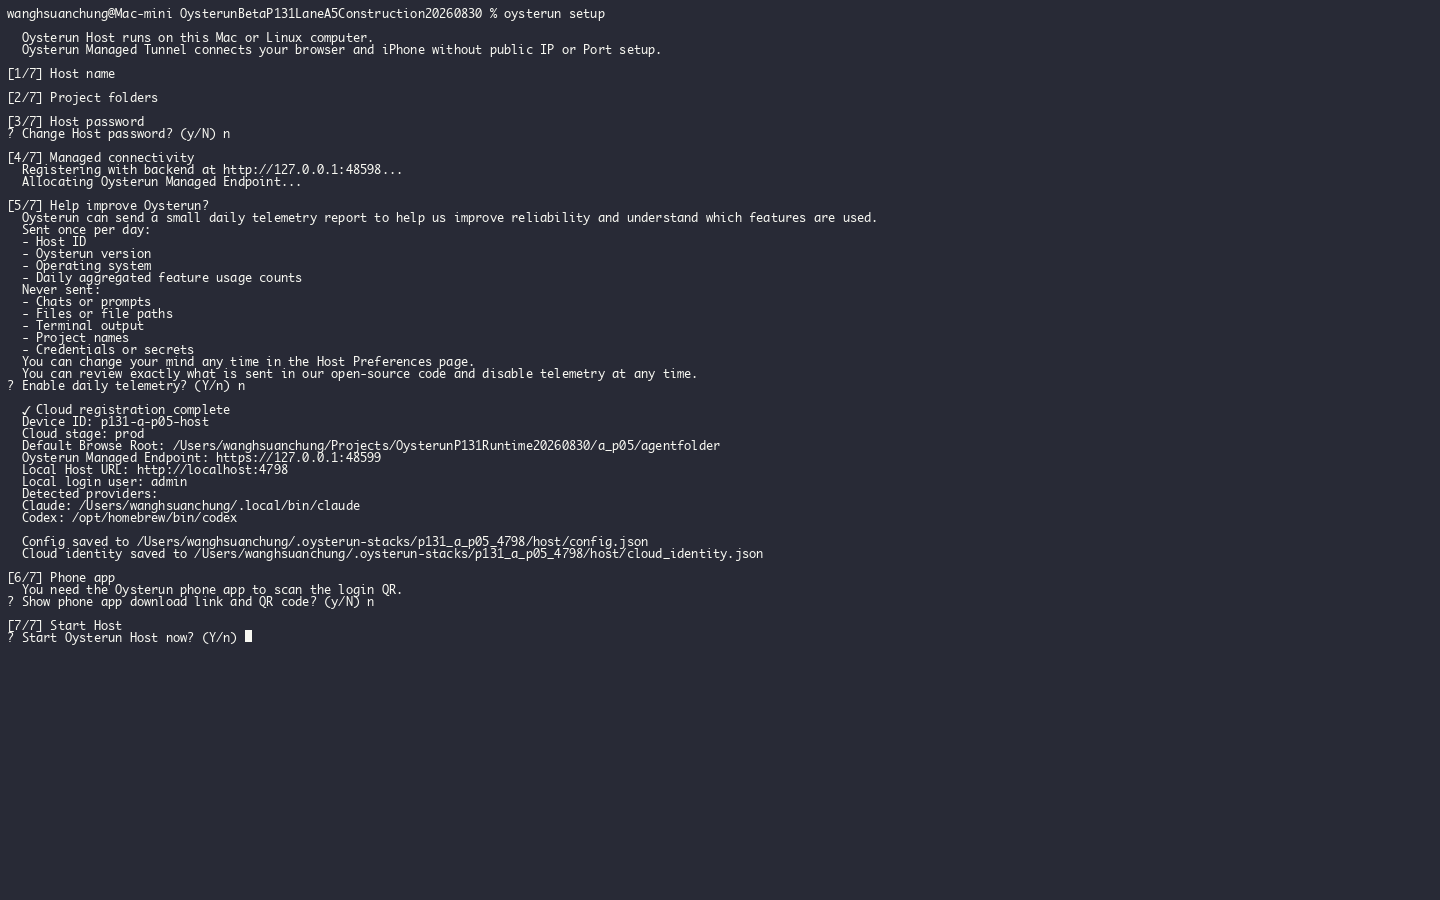
oysterun setup flow shows its numbered context from Host name and Project folders through provider detection and the step 7 Start Host question; no password input or unrelated shell history is visible.Inspect full-size screenshot
1. Host name
At Name this Host, enter a recognizable display name for this computer. It identifies the Host in product lists; it is not a Session Name or Agent ID.
2. Project folders
Choose an existing Default Browse Root. This is the Host’s project-discovery boundary and does not start a Session. It seeds Start Folder when a new Session has no explicit folder, so confirm or change the visible Start Folder in Session Setup before you start that Session.
3. Host password
Create and confirm the password. Input is hidden. The dashboard sign-in form asks for this Host password without a username field.
4. Managed connectivity
Oysterun registers or resumes this Host and allocates or reuses its stable Managed Endpoint. Normal setup does not ask you for a public IP, router port, domain, third-party tunnel, or Cloud token.
5. Help improve Oysterun?
Read the daily aggregate-report explanation and choose whether to send it. This consent does not change the Host, Session, or folder identity.
6. Phone app
Normal interactive setup asks Show phone app download link and QR code? Choose No, the default, to continue to step 7 without showing them. Choose Yes only when you want the download link and QR. Phone pairing is not required to finish the Host and web dashboard setup.
7. Start Host
For a new managed service, choose whether to start the Host now. If a managed Host is already running, the prompt becomes Restart Oysterun Host now?; stop unless the exact restart is currently authorized. A successful start may open the dashboard automatically.
4. Confirm that the intended Host is ready
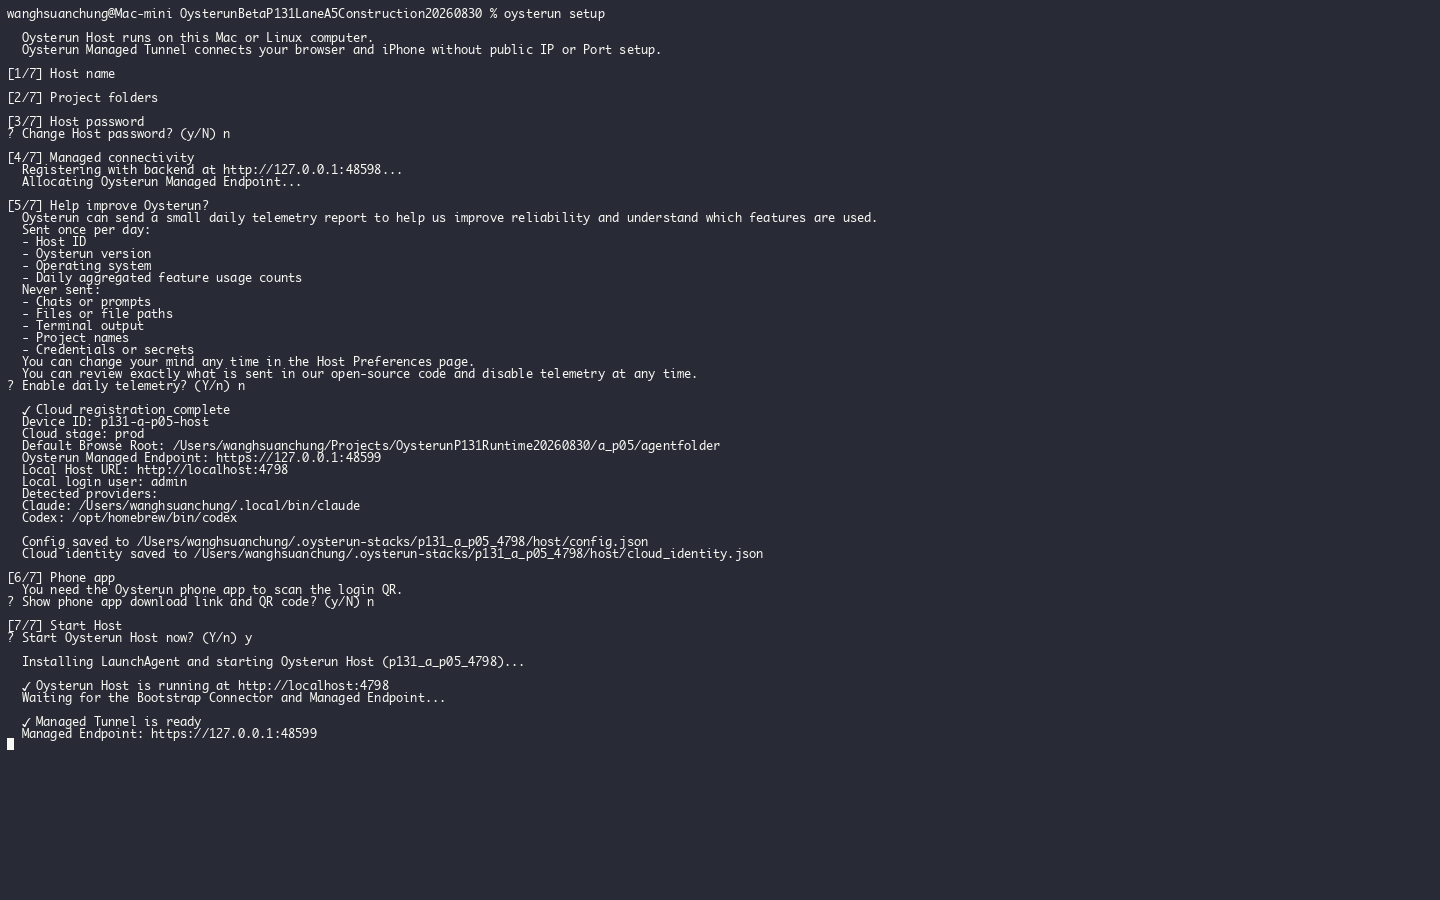
Inspect full-size screenshot
- After a successful Managed start, find Managed Tunnel is ready and the printed Managed Endpoint. Setup also prints a local or Direct Host URL.
- Open the Managed Endpoint when it is ready. On the same trusted network, the Direct Host URL is the bounded fallback while Managed provisioning is pending.
- Enter the Host password and choose Open Oysterun.
- Wait for Sessions and confirm Connected.
- Open the Oysterun menu, choose Host Preferences, and find Host Identity And Browse Root. Confirm Host Display Name and Default Browse Root match setup.
If you deliberately chose not to start in step 7, the supported explicit start command is oysterun service:start. Run it only when starting that configured Host is authorized.
5. Keep the five visible identities separate
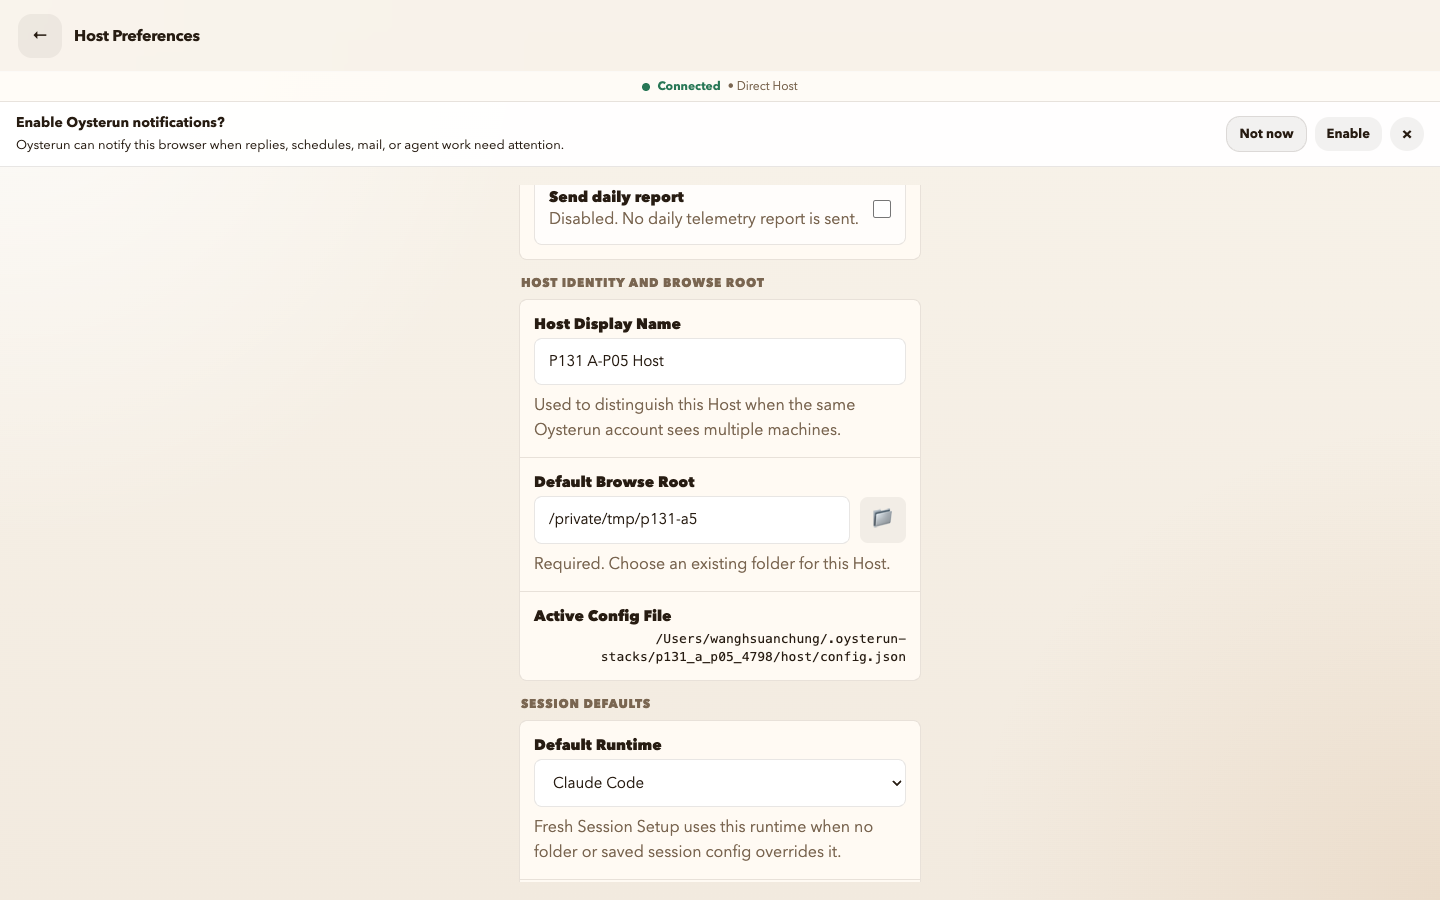
/private/tmp/p131-a5 with its folder control and default runtime.Inspect full-size screenshot
Host
The Oysterun service on one computer. Read its Host Display Name, Default Browse Root, and connection addresses in Host Preferences. An endpoint opens this Host; it is not a Session or a public Website link.
Session
One conversation and provider runtime on that Host. The human-facing Session Name appears in Sessions and Chat. Its exact immutable Session ID appears in Session Profile.
AgentFolder
The exact working folder selected as Start Folder and later shown as Working Directory. It owns the Session’s files. One folder can be used by more than one Session; that does not merge those Sessions.
Agent ID
A visible grouping and attribution label entered in Session Setup and shown in Session Profile. It does not choose the folder, replace the Session ID, identify the Host, or form a Website URL.
Shared Website link
The URL copied with Website Copy link or the Website browser’s Copy browser link. Its /sites/…/ route points to the Website resolved from the project folder. Do not invent it from Agent ID, Session Name, or Session ID.
6. Create one Session and read its identity back
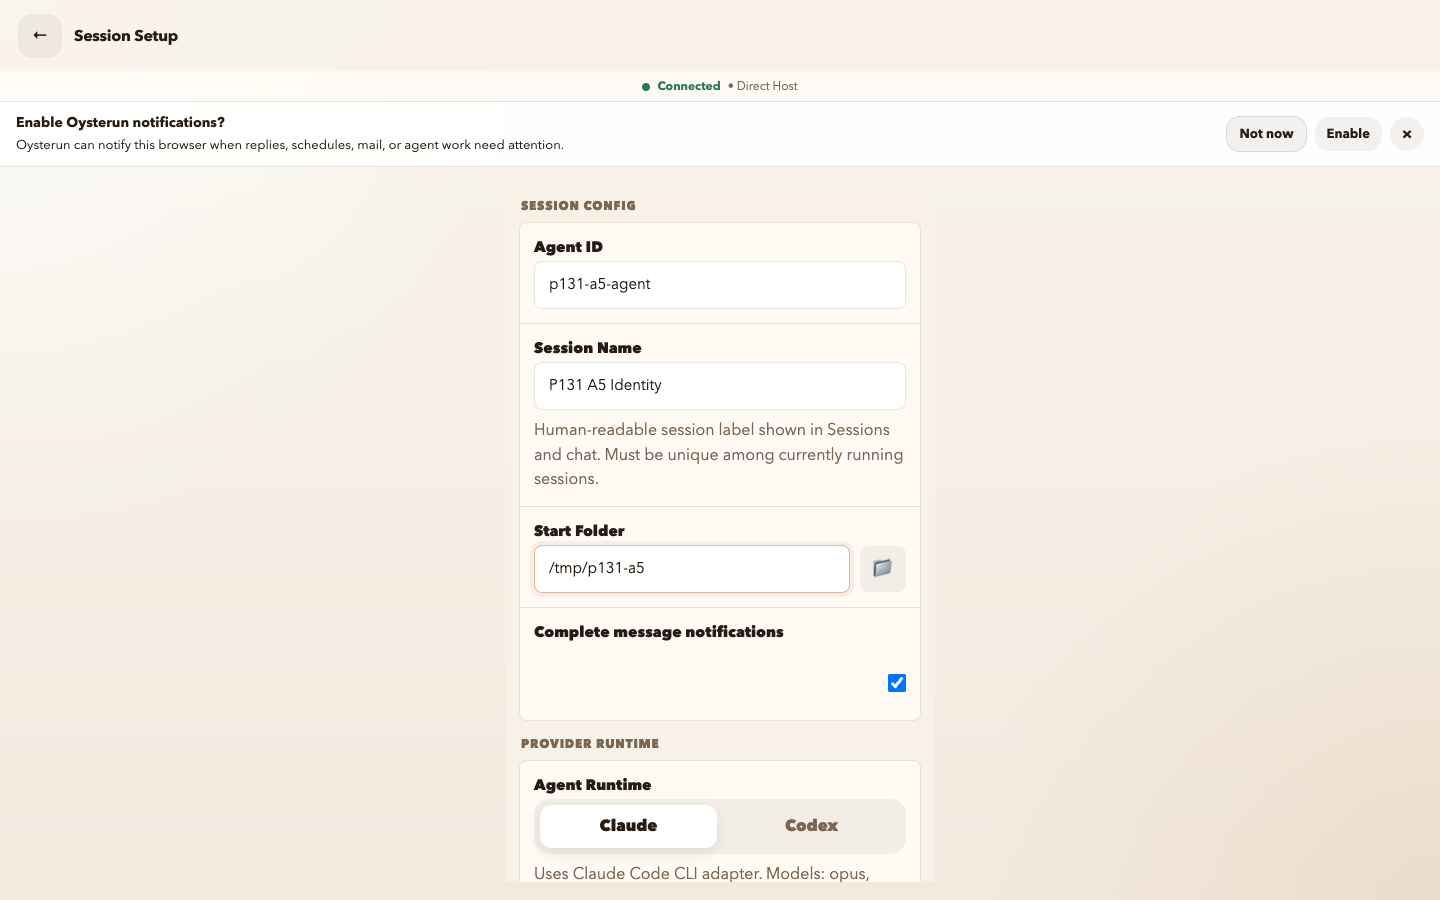
p131-a5-agent, full Start Folder /tmp/p131-a5, and Claude selected, while the header confirms the connected Direct Host.Inspect full-size screenshot
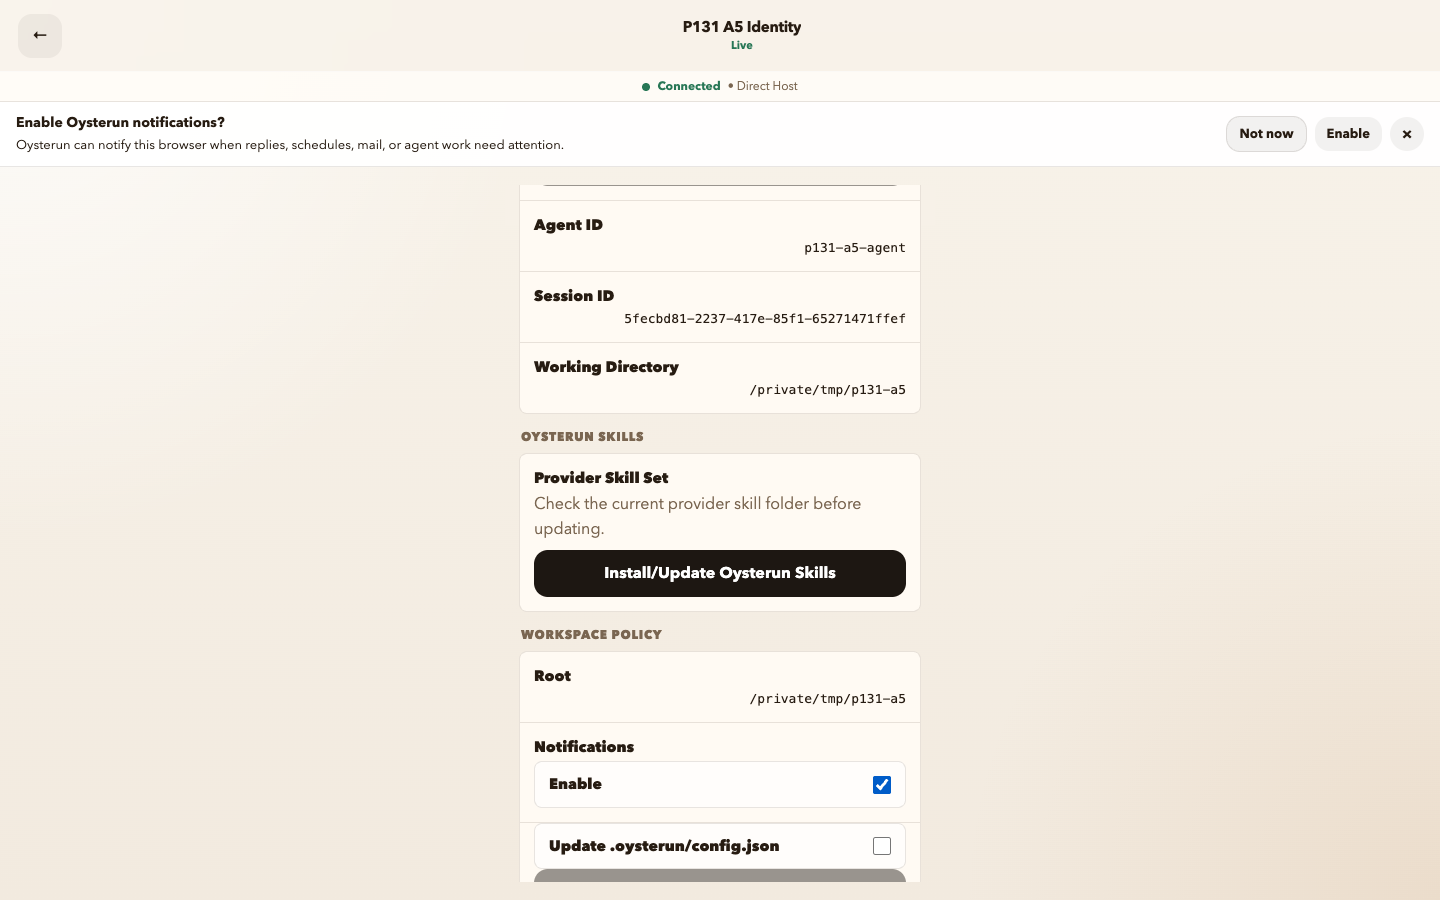
p131-a5-agent, its separate generated Session ID, and the complete macOS-resolved Working Directory and Workspace Policy Root /private/tmp/p131-a5.Inspect full-size screenshot
- From Sessions, choose New Session.
- In Session Setup, enter a recognizable Agent ID and a unique Session Name.
- Choose the intended Start Folder. Do not assume it is the entire Default Browse Root.
- Review the available provider settings, then choose Start Session.
- When Chat opens, choose the top-bar Open Session Profile control for that live Session.
- Compare Agent ID with your entry, Working Directory with the chosen Start Folder, and note that Session ID is a separate generated value.
Visible checkpoint: the Chat top bar exposes Open Session Profile only for the current live Session; the profile then shows the Agent ID, Working Directory, and separate Session ID used for this comparison.
Checkpoint: the Host contains the Session; the Session uses the AgentFolder; Agent ID labels attribution; and Session ID still identifies the exact Session. Matching text never makes them the same authority.
7. Verify a shared Website link without guessing
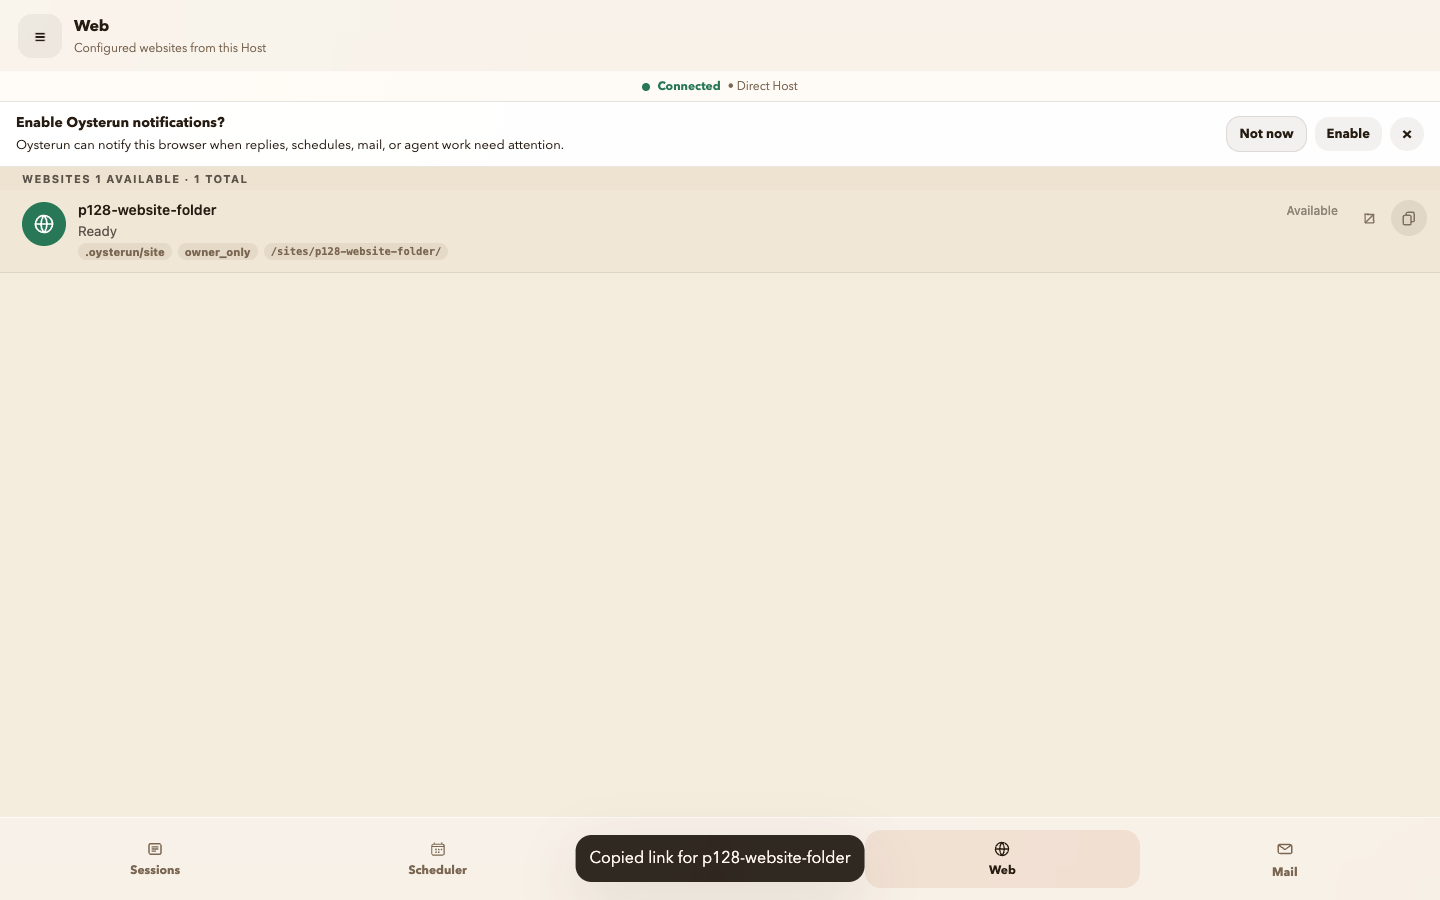
p128-website-folder row is Ready and Available at /sites/p128-website-folder/; its copy control has produced the visible “Copied link for p128-website-folder” result.Inspect full-size screenshot
- Continue only if the intended folder has an enabled Website and appears on the Website surface.
- Confirm that the Website row shows the intended folder and a visible
/sites/…/entry path. - Choose Copy link, or open the Website and choose Copy browser link.
- Open the copied URL as the intended audience and confirm that it shows the Website for that folder.
If the Website row is absent, unavailable, or belongs to another folder, stop. Do not substitute the Host endpoint, Agent ID, Session Name, Session ID, or a local file path as a shared link.
Recover safely and know when to stop
- No provider is detected: cancel with the default No for a no-change result, or continue knowingly and install/sign in to Codex, Claude Code, or Grok for the Host’s operating-system user before creating a Session.
- Managed connectivity remains pending: use Direct access only on the same trusted network, then rerun setup after the network prerequisite is fixed. Do not reset the Host identity.
- Setup asks to restart an existing Host: stop without current permission for that exact Host and action. Do not replace it with a service or terminal restart from this guide.
- Host Display Name or Default Browse Root is wrong: stop before starting a Session. Correct the visible Host Preferences value and choose Save, or use Reset/Reload before saving when you need to discard or reread the draft; do not edit hidden configuration.
- Agent ID or Working Directory is wrong: stop before relying on the Session for attribution or files. Return to Sessions and create the intended Session through Session Setup; do not rewrite a Website route or private record to disguise the mismatch.
- No valid Website link is visible: no shared Website identity has been proved. Return to the intended Website row and resolve its visible availability instead of constructing a link.
Safe stop: ordinary work begins only after the intended Host is Connected, its Host Preferences match setup, the Session Profile matches the chosen AgentFolder and Agent ID, and every shared link resolves to the intended folder-owned Website.